


Explain that the children should recall what they remember about programming using MakeCode.
Display the Presentation: Speak like an expert and arrange the children into pairs. Allow time for them to share their ideas using key vocabulary.
Presentation mode. Choose what to show your class.
Gift this lesson to a teacher friend to give them free access for 30 days!
Share lessons with your friends and colleagues for free. Learn more
Downloading may not be your best option. Be sure you are looking at the most up-to-date version by always viewing your resources online.
Bookmark or save the link to this lesson so you can find it quickly! Click on the format below to continue download.
Creating and testing a program that uses the temperature sensor.
New statutory RSHE guidance is here. We’re creating our brand new RSE & PSHE scheme ready for September 2026. Learn more
Computing
Pupils should be taught to:
Working scientifically
Pupils should be taught to:
In collaboration with The Micro:bit Educational Foundation.
Check all images, videos, links and presentation slides are suitable for your class.
*These are external websites and we do not have control over their content – please check before showing them to the children.

Print in advance of the lesson.
Subject knowledge
Completed example of the Activity: Weather checker: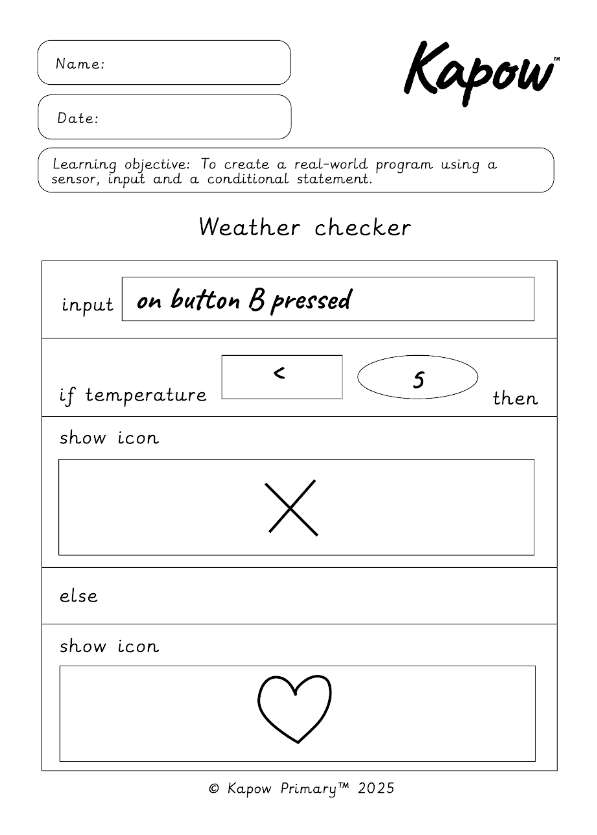
Adaptive teaching: Greater depth code examples
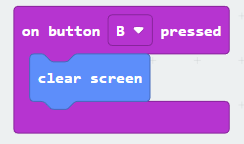
To clear the screen, children need to add an input (on button press) and use the ‘clear screen’ block.
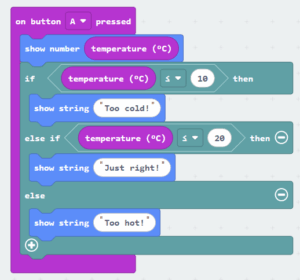
To add an extra condition, children can click the plus icon on the ‘if block’ to include an ‘else if’. Instead of using icons, they can use the show string block to display a message. The program is no longer choosing between two outcomes, but checks the temperature step by step to decide the most suitable response.
Lesson organisation
This unit uses a BBC micro:bit, a physical programmable device. BBC micro:bits are available to buy or borrow, often from a local library, if not already available in school.
If physical devices are not available, the virtual micro:bit in Microsoft MakeCode can be used as an alternative.
Programming language
This unit uses MakeCode, a block-based editor similar to Scratch. Although the BBC micro:bit can also be programmed in Python, a text-based language, Python is not used in this unit.
Key setup information
Accessing and saving projects in MakeCode
Microsoft MakeCode does not require a login. Projects save locally in the browser on the device being used. For this reason, the pupils should ideally use the same device each lesson so their projects remain visible in ‘My Projects’. If pupils need to continue work on a different device, model how to download and re-upload a project using a .hex file:
Open the project in MakeCode.
Using tablets
Using laptops or desktops
Accessing the project
Before the lesson, ensure that the Storm the scoreboard program is pre-loaded onto at least one micro:bit.
The project can be opened in two ways:
Option 1: Opening the project through the link
Click the links: Microsoft MakeCode -Storm the scoreboard and Microsoft MakeCode -Weather checker to open the projects in MakeCode. Press ‘edit’ to store a copy in the browser. Logging in is not required. Rename the project to keep edits separate from the original in the text box along the bottom of the screen.
Option 2: Using the .hex file
Download the Download: Storm the scoreboard .hex file and the Download: Weather checker .hex file from the Have ready. Double-click the folder to access the files and then drag and drop them into the MakeCode editor.
This process can also be seen in these videos:
The information within this section provides basic generic guidance only and is not tailored to the circumstances of your school or class. You must ensure you refer to and follow your own school’s health & safety policy and complete any necessary risk assessments. It is the teacher’s responsibility to check all resources and lesson content to ensure it is suitable for their class setting.
Health and safety
Explain that the children should recall what they remember about programming using MakeCode.
Display the Presentation: Speak like an expert and arrange the children into pairs. Allow time for them to share their ideas using key vocabulary.
Take feedback, highlighting any accurate use of subject-specific terms.
The children may share that:
Hand out the micro:bits with the pre-loaded scoreboard program (see Teacher knowledge) and arrange the children into pairs. Alternatively, load the program onto one micro:bit and complete the quiz as a whole class, inviting volunteers to take turns.
Display the Quiz: Storm the scoreboard and explain that the children will take part in a weather quiz and the micro:bit has been programmed to function as a scoreboard. Assign one child in each pair to be Player A and the other Player B.
Display the quiz questions one at a time. After each question, click to reveal the correct answer. If a player is correct, they press their assigned button to log the score (button A for Player A and button B for Player B). The first player to reach five correct answers wins.
Ask the children:
Display the Presentation: Scoreboard code explained.
Click to reveal and discuss the function of each block:
Ask the children:
Explain that the children will use the micro:bit’s built-in temperature sensor to create a weather checker. The device will respond based on the temperature, using a conditional statement to decide what happens when certain conditions are met.
Play the Pupil video: Programming a weather checker.
Explain that the children will decide what they think is a suitable temperature for PE. The example in the video uses 10°C and below as the threshold but they can set their own.
Note: the temperature may need to be adjusted depending on the season.
Ask the children:
Hand out the Activity: Weather checker (one between two). Explain that the children need to plan the parts of their program before coding. Display a completed example of the planning sheet on the board to show how each section should be filled in (see Teacher knowledge).
Image: Weather checker sheet example
Hand out the devices (one per pair) and ask the children to open the link: Microsoft MakeCode and open a new project. Allow time to complete and test the program. Ensure each program is downloaded onto a micro:bit once finished (see the Pupil video: Pairing the micro:bit (laptop and desktop version) and Pupil video: Pairing the micro:bit (tablet version)).
Take the children to the hall or playground in pairs, each with their micro:bit, whiteboard and a pen. Explain that they will test their programs by collecting temperature readings in different areas.
Ask the children to walk to locations such as a window, door, bench or piece of outdoor equipment. Explain that they will press button A (or their chosen input) to check the temperature (displayed on the LED grid) and record it on their whiteboard.
Join two pairs together once they have collected readings. Ask each group to report back like weather forecasters, using phrases such as:
Ask the children:
Learning objective
Success criteria
Vocabulary
Using the extended display mode will allow you to view your lesson plan on one screen, while displaying presentation mode on the other.
Follow this guide or watch our explainer video to extend your display.
How to extend your display to view the lesson page and presentation mode simultaneously. Choose your operating system below to watch the video
If you need further support with extending your display,
please contact [email protected].
Extended-mode explainer video: For Mac
Extended-mode explainer video: For Windows
Pupils needing extra support
Should use the Download: Weather checker .hex file or the link: Microsoft MakeCode - Weather checker and remix the code to personalise it (for example, change the temperature and the icons); could re-watch the Pupil Video: Weather checker during programming to reinforce the purpose and sequence of blocks.
Pupils working at greater depth
Should add a ‘clear screen’ function and explain how this improves the program’s usefulness; should add more than one condition to display different messages depending on the temperature range; could include an additional custom message (for example, ‘Wrap up warm!’ between 5–10 °C or ‘Keep hydrated!’ above 25 °C) – (see Teacher knowledge).
Pupils with secure understanding indicated by: using the temperature sensor block and creating a variable to store temperature data; programming a simple conditional statement to trigger a reaction based on the temperature; testing their code on a micro:bit and explaining how the device responds to the temperature reading.
Pupils working at greater depth indicated by: modifying their code to include a clear screen function and explaining how this improve the program’s usefulness; programming multiple conditional statements to trigger different outputs for different temperature ranges.
A rule in code that makes something happen only if a specific condition is true.
An action that gives the micro:bit information, such as pressing a button or shaking it.
A built-in device that detects information from the environment, such as light, temperature or movement.
We welcome your feedback to help make our resources even better
Created by:
Maintained by: Kapow Primary team
Last update: 20th January, 2026

Applying computing skills to program a Micro:bit animal monitor and using 3D CAD tools in...

Exploring reversible changes, including dissolving and changes of state and developing the working scientifically skill...

Exploring the changes of state, condensing and evaporating, and investigating evaporation rates.

Observing daily weather patterns by investigating weather in the school grounds.
